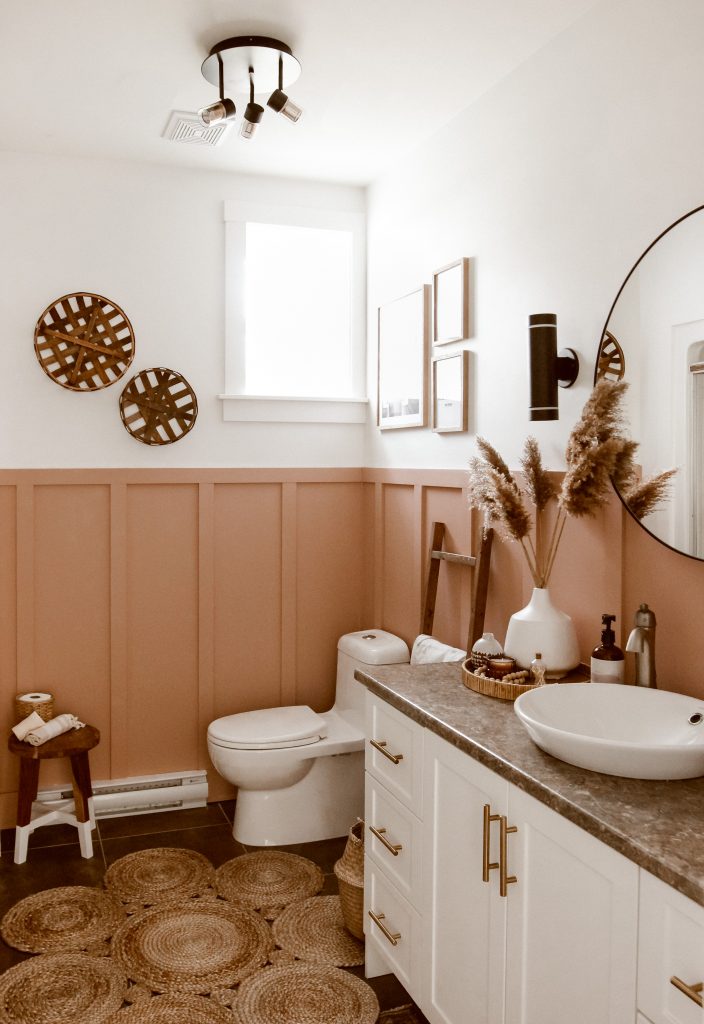
We finally tackled our guest bathroom! There are so many elements I love about this little space in our home. Not only is this our guest bathroom, it is also the bathroom most used during the summer months. With the summer months approaching and since we are home anyway, it gave us a great opportunity to make a few improvements in here! I’m also sharing 4 tips and things to consider while looking for bathroom lighting.

And to think, this little bathroom transformation all stemmed from picking out new lighting from Artika Lighting. Then one thing led to another and here we are with a little bathroom transformation.
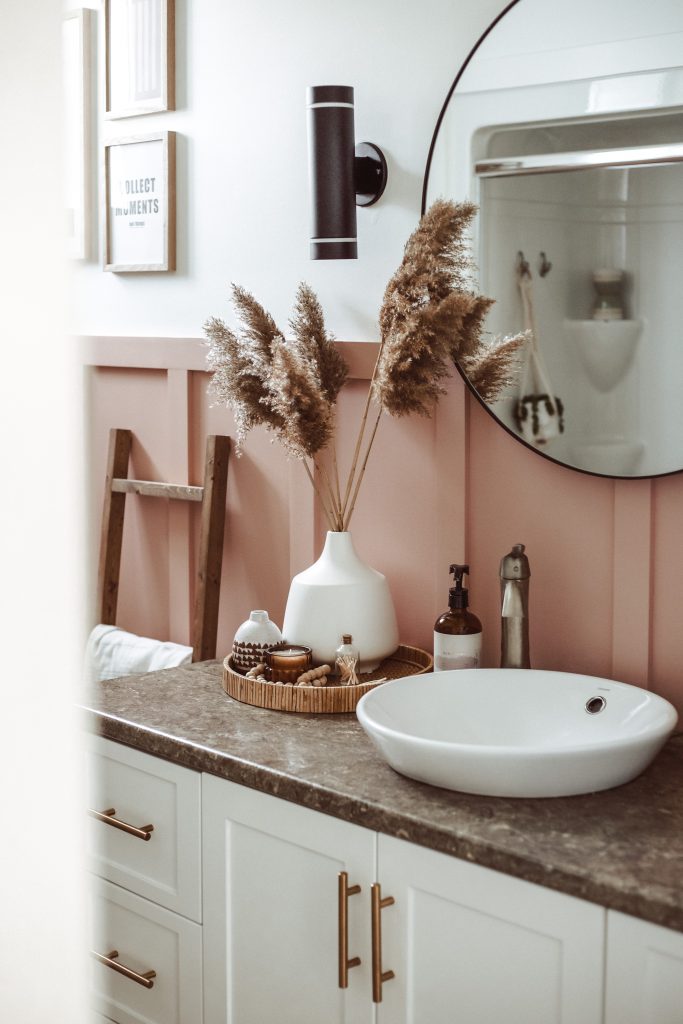
I’m so thankful for the opportunity to partner with Artika Lighting. They have a gorgeous selection of lighting that fit into any style home. For our bathroom, since I wanted something bold we went with these matte black sconces and ceiling light. The Oxion ceiling light has a matte black finish and brushed brass accents. It’s modern and versatile and I love when this light is on, the way the light reflects off the walls and ceiling creating a beautiful pattern. It is also dimmable and the three lights are adjustable so you can change the direction of the light. We also went with two C7 Black Sconces. They are indoor / outdoor lights so I knew they would be great in a bathroom since it can get moist. The C7 style is simple yet bold in the matte black and looks great on either side of our bathroom mirror.

Artika has so many lovely styles, they have a large selection of lighting that caught my eye. The quality is impressive and the pricing is very reasonable making updating the lighting in your own home accessible. I upgraded my bathroom lighting for under $310 CAD. I placed my order online and it shipped directly to my home in less than a week. Artika is offering 10% off with code AMY10!
We’ve lived here for a little over two years and can you believe I didn’t even hang one piece of art in here?! We have only one tiny window so this space was a little dark and in need of better lighting. I like to call this “Phase 1” for our guest bathroom because eventually I’d like to change a few other things. These changes we recently made look so good, and I’m excited we made these changes now so we can enjoy them until we are ready to {eventually/ hopefully} tackle phase 2. I’d like Phase 2 to include upgrading (countertop, sink, faucet and maybe even flooring). I’ve included a photo of what the bathroom looked like BEFORE we moved in to give you an idea how far we’ve come. (see end of post)

Once we got rolling on this project, I quickly realized it should have been more of a priority to make these few changes. And it all started with a bright idea 💡 to simply change the lighting, then it snowballed into adding color, plants, towels, rug, artwork, and a little styling. To be honest – maybe we will never get to phase 2, and I’m totally ok with that since these changes were attainable for us today and now feel like this bathroom is an extension to the rest of our home vs how empty and cold it felt before. These improvements are affordable and simple and make me love this little bathroom.
When it comes to planning a space in my home, I almost always select my lighting FIRST. I’m not sure that is how the pros do it but I like to find the vibe I’m going for. Color, style, size, finish etc, then I plan the other details to pull it all together to achieve the overall look I’m going for. In our guest bathroom I wanted our lighting to be bold so that it would pop.

4 Tips for the getting your bathroom lighting *just right*
1) Flank your Bathroom Mirror with Sconces
I love this look when sconces are on each side of the mirrors. Not only does it give balance to a space, but the way the light hits your face when looking in a mirror, it casts less shadows. (and you don’t want that when applying makeup or shaving!) We already had scones positioned here so it made upgrading to the C7 Sconces really easy.
2) Pairing multiple fixtures + selecting the Finishes
When you have more than one lighting source in a space, I like to have fun with ceiling mounted fixtures. If you have the height you can add some style with a fun chandelier or pendant light. The ceiling light should be cohesive and compliment the other fixtures in your bathroom. We stuck with the matte black finish in both our bathroom lights and our ceiling light has a little extra sparkle, brushed brass accents. I suggest selecting one or two finishes for your lighting and be sure to add some accessories throughout the room to compliment those light fixtures.
3) Plan and Visualize
If you are unsure about size, simply use some cardboard to size up the general dimensions and hold it up in your space to see if you like the size. This is a trick I do often and it really helps me to visualize if something is too big, too small or just right. Painters tape also works with flush mount light fixtures but I personally love using cardboard to get a better idea to really help envision the light fixture in my space.

4) Consider Dimmable Lighting
The bathroom is a multi functional room so you want to make sure the lighting is right for different points throughout the day. For example if you are awake early and need to shower, you probably don’t want a super bright shower, but you would want bright lighting for doing your makeup. Having the flexibility to adjust the lighting is important to consider so be sure to think about dimmable lighting options.
Proper lighting in a bathroom can make all the difference. I enjoy selecting lighting mostly based on style and how it looks but the lighting also needs to be able to work in our day to day lives, especially with guests + visitors in mind. Be sure to check Artika’s selection, they are available in over 20 countries and have great quality, affordable, stylish and modern lighting solutions for all of your lighting needs.
Thank you for following along with our Guest Bathroom project. I hope this post will inspire you to update a bathroom or even another space in your home! If you have any questions or comments please let me know!
Xo Amy
PS – Since I know many of you are wanting to know about paint colour I won’t leave you hanging! It is SANDPAPER PPG1062-4. Please note that my photos are edited so it does appear slightly different in person and of course depending, on the lighting;)


Leave a Reply